


Introduction
Today, we're revisiting Python and Pygame, a topic that always garners a lot of interest. In the past, I've found it challenging to design a game and write a comprehensive Substack post at the same time, given the level of detail and complexity involved. That's why we're embarking on a multi-part article series dedicated to Pygame development. This series might span several weeks or even a couple of months, intermingled with my usual text-heavy technology discussions. This format will allow us to explore the nuances of game development without rushing through the important details.
For Part 1 of our Pygame journey, we're going to focus on sprite sheets. I've been hesitant to go this route in the past. Incorporating sprite sheets can demand extra debugging, design effort, and a good deal of graphic design work, especially at the outset. However, by limiting this initial article to the fundamentals (interpreting a sprite sheet, building translation mechanisms, and establishing some basic movement rules) we can lay a solid foundation for the subsequent parts. While I'm doing my best to plan ahead for this Substack series, please keep in mind that the nature of game development often involves unforeseen challenges. What you see here in Part 1 might evolve significantly by Part 3 or beyond, especially if I discover any incompatibility or run into unexpected debugging hurdles. This iterative approach is obviously a natural part of the development process. The source code will be mirrored to the progress in each successive part of this series.
For this game, I'm envisioning a blend of inspirations, pulling elements from classics like Mario Brothers, Donkey Kong, Dig Dug, and perhaps even Pac-Man. I'm calling our game Candygrab, and the protagonist, your player character, will be a ghost. A floating ghost is notably easier to animate than a walking and jumping character, which is a nice bonus. If all goes to schedule, we should have a complete game by the time Home Depot starts thinking about putting out their Halloween and Christmas decorations.
I picture our ghost hero drifting around, collecting all the candy before being pursued and eventually caught by some robotic mechanism trying to exorcise the poor spirit. (These enemies will probably look like monstrous shop vacs.) Our ghost can't jump; it must float around the structure and, for some reason, even use ladders (yes, I realize binding a ghost to gravity makes little sense, but again, this simplifies animation). However, our ghost does have the ability to use neutron waves to destroy enemies, much like the pump in Dig Dug.
Once the ghost gathers all the candy (saving it for some well-deserving kid, perhaps), the level clears, and you advance to the next stage. Stages will be easily designed using a simple text editor. We'll also do some Pygame wizardry to change the color hues on structural elements from the sprite sheet as levels progress, much like games in the 80s did. (This was one of my favorite elements of Atari's Missile Command on the 2600, as you advanced, the color palettes became much crazier than the orange and purple of the first levels.) In a later part of this series, we'll go back and add music, stage interstitials, box art, and other polish.
Understanding Sprite Sheets
At the heart of many classic and even modern 2D games lies a fundamental concept: the sprite sheet. Essentially, a sprite sheet is a single image file containing multiple smaller images, or sprites, arranged in a grid. Think of a sprite as an individual 2D image. This could be a character, an enemy, a power-up, or a piece of scene, while the sprite sheet is the comprehensive collection of these individual sprites. Instead of loading each graphic element as a separate file, games efficiently load one large sprite sheet and then selectively display specific portions of it. This method offers significant advantages in game development by improving performance and simplifying asset management. Game engines use coordinates (typically X and Y positions, along with width and height) to identify and "clip" the exact section of the sprite sheet that represents the desired sprite at any given moment. This allows for smooth animations, as the game can rapidly switch between different frames of a character's walk cycle, for example, all sourced from the same loaded image. Beyond character animations, sprite sheets are also commonly used for other game elements like user interface icons, particle effects, environmental details, and even entire tile sets for level backgrounds.
Many iconic games have leveraged sprite sheets to bring their worlds to life. Consider the classic platformer Super Mario Bros., where every frame of Mario's jumping, running, and fireball-throwing animations, as well as the Goombas, Koopa Troopas, and power-ups, were meticulously laid out on sprite sheets. Similarly, the detailed character movements in fighting games like Street Fighter II relied heavily on intricate sprite sheets for their extensive animation frames. Even role-playing games such as Final Fantasy VI (known as Final Fantasy III in North America for a time) utilized sprite sheets for its vast array of characters, monsters, and world map tiles. These examples highlight how sprite sheets have been, and continue to be, a foundational technique for efficient and visually rich 2D game development.

In the early days of computing, when memory was scarce and processing power limited, sprite sheets were not just a technique, but an absolute necessity for game development. Systems like the Atari 2600 and original Nintendo Entertainment System (NES) had extremely constrained hardware when compared to today’s systems. Loading dozens or hundreds of individual image files for every character, enemy, animation frame, and environmental tile would have been computationally prohibitive, leading to agonizingly slow load times and abysmal performance. Sprite sheets, by consolidating all these visual assets into a single, larger texture, drastically reduced the number of separate file I/O operations and optimized memory usage, making fluid 8-bit graphics even possible. Today, with modern computers boasting gigabytes of RAM and powerful GPUs, using a sprite sheet for a simple Pygame project is less about overcoming hardware limitations and more about a strategic design choice. It's a novel approach that streamlines asset management, maintains the nostalgic aesthetic of classic games, and can still offer minor performance benefits by reducing draw calls, even if those benefits are no longer critical for basic gameplay on contemporary hardware.
Here’s a good video from Andreas Loew on YouTube that explains all of this.
Candygrab’s Sprite Sheet
For our efforts, I’m starting out with a 960x960 pixel Photoshop document, where I can divide this down to a 10x10 grid of individual cells. When I save this, it will be scaled to 320x320 pixel PNG file with transparency, which is what will be delivered with source code. The transparency of the backgrounds will lend itself to our animation functionality as well (an object can be drawn over another object such as a ladder instead of blocking altogether).
By using a 32x32 pixel sprite element, this gives us a 18x25 arrangement of base cells in a 800x600 px game surface. That is, our base structure or maze can be about 25 sprites wide and about 18 pixels high (though we may not use all that width and height for scoring display or other considerations).
By using Photoshop at 960x960, I can more easily design subtle details and check to see how everything fits before shrinking down to 320x320. I’m using Photoshop’s grid feature to help me lay things out on the Sprite sheet as well.
Here is our tentative sheet for Part 1. Yes, there’s a lot of empty space, but this will fill in for later parts. I selected these positions with a bit of strategy; it may be easier to animate our ghost by having four frames in the ghost animation, and I can simply increment a counter to move over the “X” axis in this spite. Likewise, I placed the ladder and structure elements off in a section so I could verify that the ladders and floor structures mostly line up with each other.
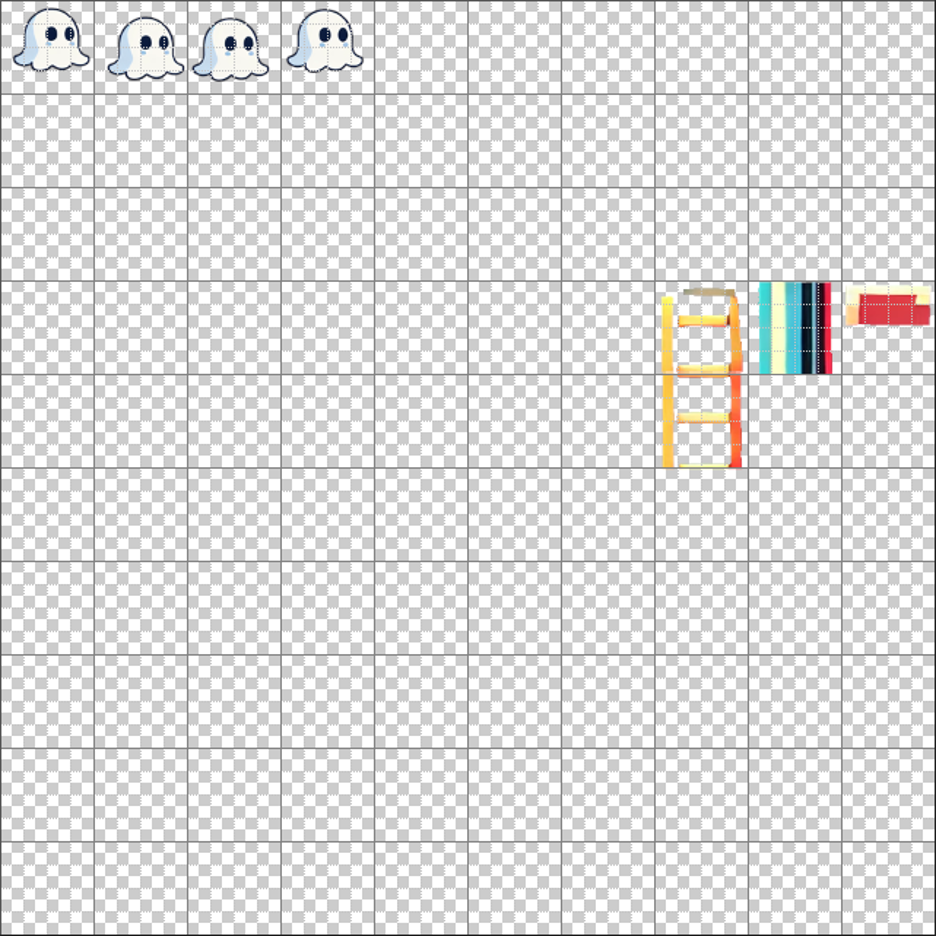
Right now, the ghost just kind of moves around in a “floaty” motion, but I may do some slight rotation in his feet/whisps at the bottom to amplify the floaty motion at some point.
Level Design
I wanted to keep this part as simple as possible. There are two benefits to this, in my opinion. The first being that I don’t have to use some editor or design an editor. Secondly, by using a simple text format which is interpreted by the game allows you (the reader of this article) to make and design your own levels.
Right now, the “outer” structure of the levels are contained in a JSON file, which references a map of the level. I’m planning on allowing different music files for each level, as well as leaving the game engine itself open for other functionality. “Tiles.csv” tells the game how to locate and draw sprite sheet elements from the given sprite sheet. In some future part of this series, we’ll add elements for the candy and the enemy characters. “Player.py” will need to be edited to interpret these new elements for movement, collision, and interaction.
Here's an example of the test level we’re working with today.
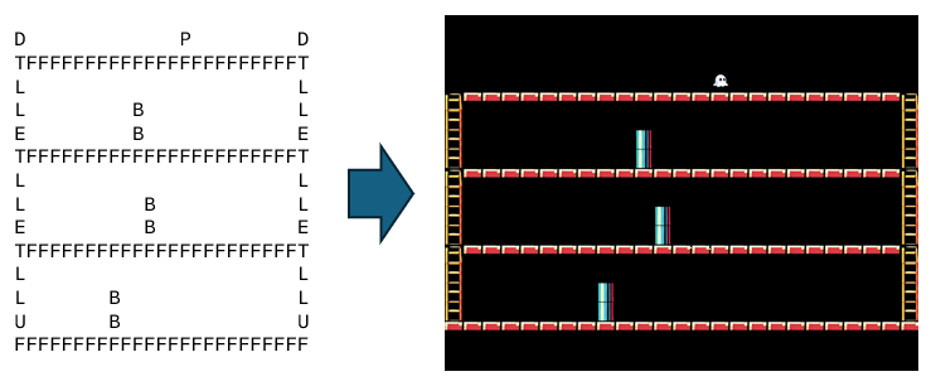
As mentioned, the location (or mapping) of these characters to the sprite sheet is defined in tiles.csv
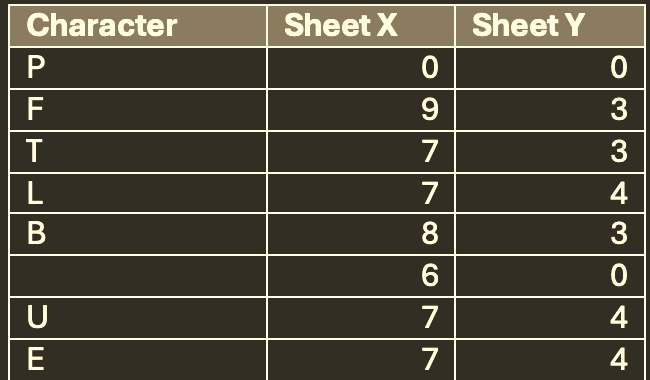
Note, whitespace being assigned to 6,0 is a design artifact. If we wanted to give our game a more exciting background, we could do this. For now, we’re just leaving it as PNG transparent which results in our solid background color in Pygame.
Movement
As mentioned above, movement is governed in “player.py”. Some explanation may need to be given here.
In context of a level draw map: U/D/E allow up, down, or either up or down movement. T/L are drawing cues for ladder structures, but Up/Down/Left/Right movement must also be governed on this. The “F” (Floor) tells us where a floor element can be found. This also allows checks to verify that left or right movement is allowed. “P” tells us where the player spawns, and “B” tells us where a solid block is present.
    def try_move(self, dx, dy, map_data):
        """
        Attempt to move the player in the specified direction.
        :param dx:
        :param dy:
        :param map_data:
        :return:
        """
        if dx == 0 and dy == 0:
            return
        new_x = self.x + dx * MOVE_SPEED
        new_y = self.y + dy * MOVE_SPEED
        cx = self.x // TILE_SIZE
        cy = self.y // TILE_SIZE
        tx = (new_x + TILE_SIZE - 1) // TILE_SIZE if dx > 0 else new_x // TILE_SIZE if dx < 0 else cx
        ty = (new_y + TILE_SIZE - 1) // TILE_SIZE if dy > 0 else new_y // TILE_SIZE if dy < 0 else cy
        if not self.in_bounds(tx, ty, map_data):
            return
        if self.blocks_lateral(dx, map_data, tx, ty, cx, cy):
            return
        if self.blocks_downward(dy, map_data, cx, cy):
            return
        if self.blocks_upward(dy, map_data, tx, ty):
            return
        self.x = new_x
        self.y = new_y


    def in_bounds(self, tx, ty, map_data):
        """
        Check if the new tile coordinates are within the bounds of the map data.
        :param tx:
        :param ty:
        :param map_data:
        :return:
        """
        return 0 <= ty < len(map_data) and 0 <= tx < len(map_data[0])


    def blocks_lateral(self, dx, map_data, tx, ty, cx, cy):
        """
        Check if the movement in the x direction is blocked by a wall or other obstacle.
        :param dx:
        :param map_data:
        :param tx:
        :param ty:
        :param cx:
        :param cy:
        :return:
        """
        if dx == 0:
            return False
        if map_data[ty][tx] == 'B':
            return True
        if map_data[cy][cx] == 'L':
            return True
        below_ty = ty + 1
        if not (0 <= below_ty < len(map_data)):
            return True
        return map_data[below_ty][tx] not in ['F', 'T']


    def blocks_downward(self, dy, map_data, cx, cy):
        """
        Check if the movement in the y direction is blocked by a wall or other obstacle.
        :param dy:
        :param map_data:
        :param cx:
        :param cy:
        :return:
        """
        if dy <= 0:
            return False
        below = map_data[cy + 1][cx] if cy + 1 < len(map_data) else ''
        return map_data[cy][cx] not in ['D', 'E'] and below not in ['L', 'E', 'U']


    def blocks_upward(self, dy, map_data, tx, ty):
        """
        Check if the movement in the y direction is blocked by a wall or other obstacle.
        :param dy:
        :param map_data:
        :param tx:
        :param ty:
        :return:
        """
        if dy >= 0:
            return False
        cell = map_data[ty][tx]
        return cell == 'F' or cell not in ['L', 'D', 'E', 'U', 'T']
For keyboard input for movement, we’re allowing W/A/S/D or the arrow keys.
The Result
All of our checks seem to work well for the goals for Part 1. The map renders correctly. The ghost travels as desired and can’t exit the floor or ladders at the wrong time (though it does seem to clip through the floor in some cases, which is trivial). Additionally, our player can’t travel through “B” (blocking) elements.
(Note, no sound is present in this phase of development).
The Code / Testing it Out Yourself
The code is available in by cloning our ongoing games repository on Github. Note specifically the “candygrab-part1” directory.
game_project/
├── assets/
│   ├── maps/
│   │   └── level1.txt               # 25x18 text map
│   ├── music/
│   │   └── placeholder.mod          # MOD music file (placeholder for now)
│   ├── sprites/
│   │   └── sheet.png                # Sprite sheet (32x32 tiles)
│   └── lookups/
│       └── tiles.csv                # Character-to-sprite lookup
├── config/
│   └── levels.json                  # Level configuration
├── main.py                          # Entry point
├── loader.py                        # Load JSON, maps, lookups
├── tilemap.py                       # Builds surface from text map and sprites
├── player.py                        # Handles player logic and animation
├── spritesheet.py                   # Slices 32x32 tiles from sprite sheet
├── input.py                         # WASD / Arrow key input handling
├── README.md
└── requirements.txt
Once you’ve installed all the library requirements, which I’m assuming you have done through my previous posts, you should be able to start the test with a simple…
python main.pyConclusion
We've covered a lot of ground in today’s post, from the high-level vision for Candygrab to the foundational concept of sprite sheets. We've explored how these collections of individual images are essential for efficient 2D game development, particularly for animations and other visual elements. Understanding sprite sheets is your first big step into building the graphics for our game, and it sets the stage for everything that comes next.
Next time, we’ll try to knock out candy and enemy spawn/animation. If you have any other questions or thoughts in the interim, feel free to comment below.